How to Use the Instant Pot Duo (For Beginners)
If you’re new to pressure cooking or you just want to know how to use the Instant Pot Duo, then you’ve come to the right place! This post includes a step-by-step guide, including how to do the initial water test and how to start the Instant Pot.
Hello there! I’m Carrie and you might know me as the author of the best-selling Healthy Meal Prep Instant Pot Cookbook!
But, I didn’t always know how to use a pressure cooker and it took me several tries before I felt comfortable using one.
Fast forward to today, and I rely on my Instant Pot on a daily basis. In fact, I recently invested in second Instant Pot Duo so I can cook two things at once. I find them to be invaluable for cooking foods in less time and more efficiently with easy clean-up.
I thought this was the perfect opportunity to update this guide for how to use the Instant Pot Duo. Many of the lessons in this article apply to other Instant Pot models as well.
What You Need to Know
The Instant Pot is an electric pressure cooker that comes in various sizes and models.
It’s different than the old stovetop pressure cooker models that our mothers and grandmothers had. Those were scary because they made a lot of noise and there were stories flying around about them exploding!
My suggestion to start getting comfortable with any of the Instant Pot models is that you understand how a pressure cooker works.
Here are some quick lessons.
- The pressure cooker works when the heating element heats up that liquid and creates steam that builds pressure inside. That enormous amount of steam under pressure is how food gets cooked so quickly, without any loss of quality.
- So, the point is that as a general rule you always need to use about one cup of liquid (water or broth or juice) no matter what you’re cooking. Sometimes, you’ll use a little less or a lot more, but one cup of liquid is almost always the minimum amount of liquid (there are a few exceptions to this rule).
- The Instant Pot is a modern, electric version of a pressure cooker that is safe, easy to use, and one of the best ways to get healthy food on the table fast. Most Instant Pots can also be used as a slow cooker, rice cooker, sous vide, sauté pan, and yogurt maker. See my favorite Instant Pot accessories for meal prepping.
That said, it can be intimidating getting used to a whole new way of cooking. I hope this post offers some guidance and assurance that it’s not that hard to get started.

Getting Started with Your Instant Pot Duo
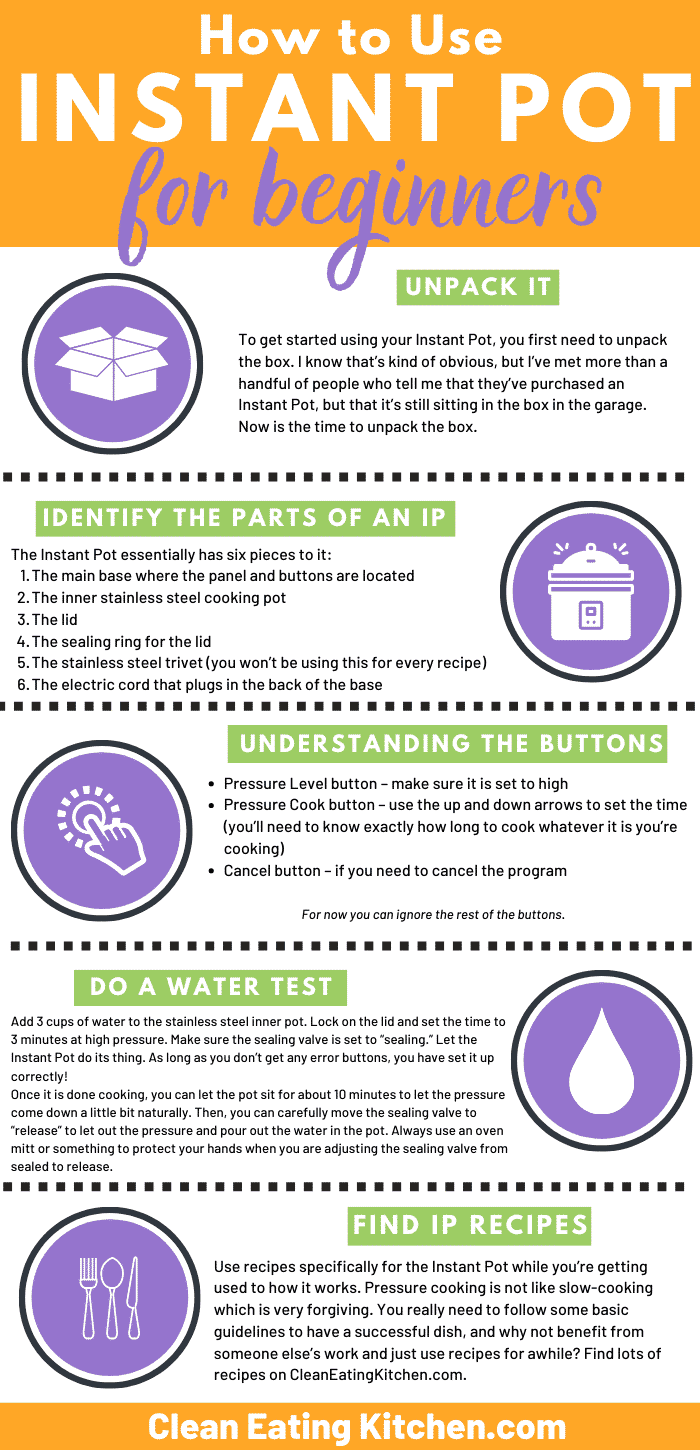
1. Unpack the box
To get started using your Instant Pot, you first need to unpack the box.
I know that’s kind of obvious, but I’ve met more than a handful of people who tell me that they’ve purchased an Instant Pot, but that it’s still sitting in the box in the garage.
Now is the time to unpack the box! I promise I will help you figure out what is what on your Instant Pot Duo.
2. Identify the pieces
Once you’ve opened the box with your new Instant Pot, then it’s time to get familiar with what is included.
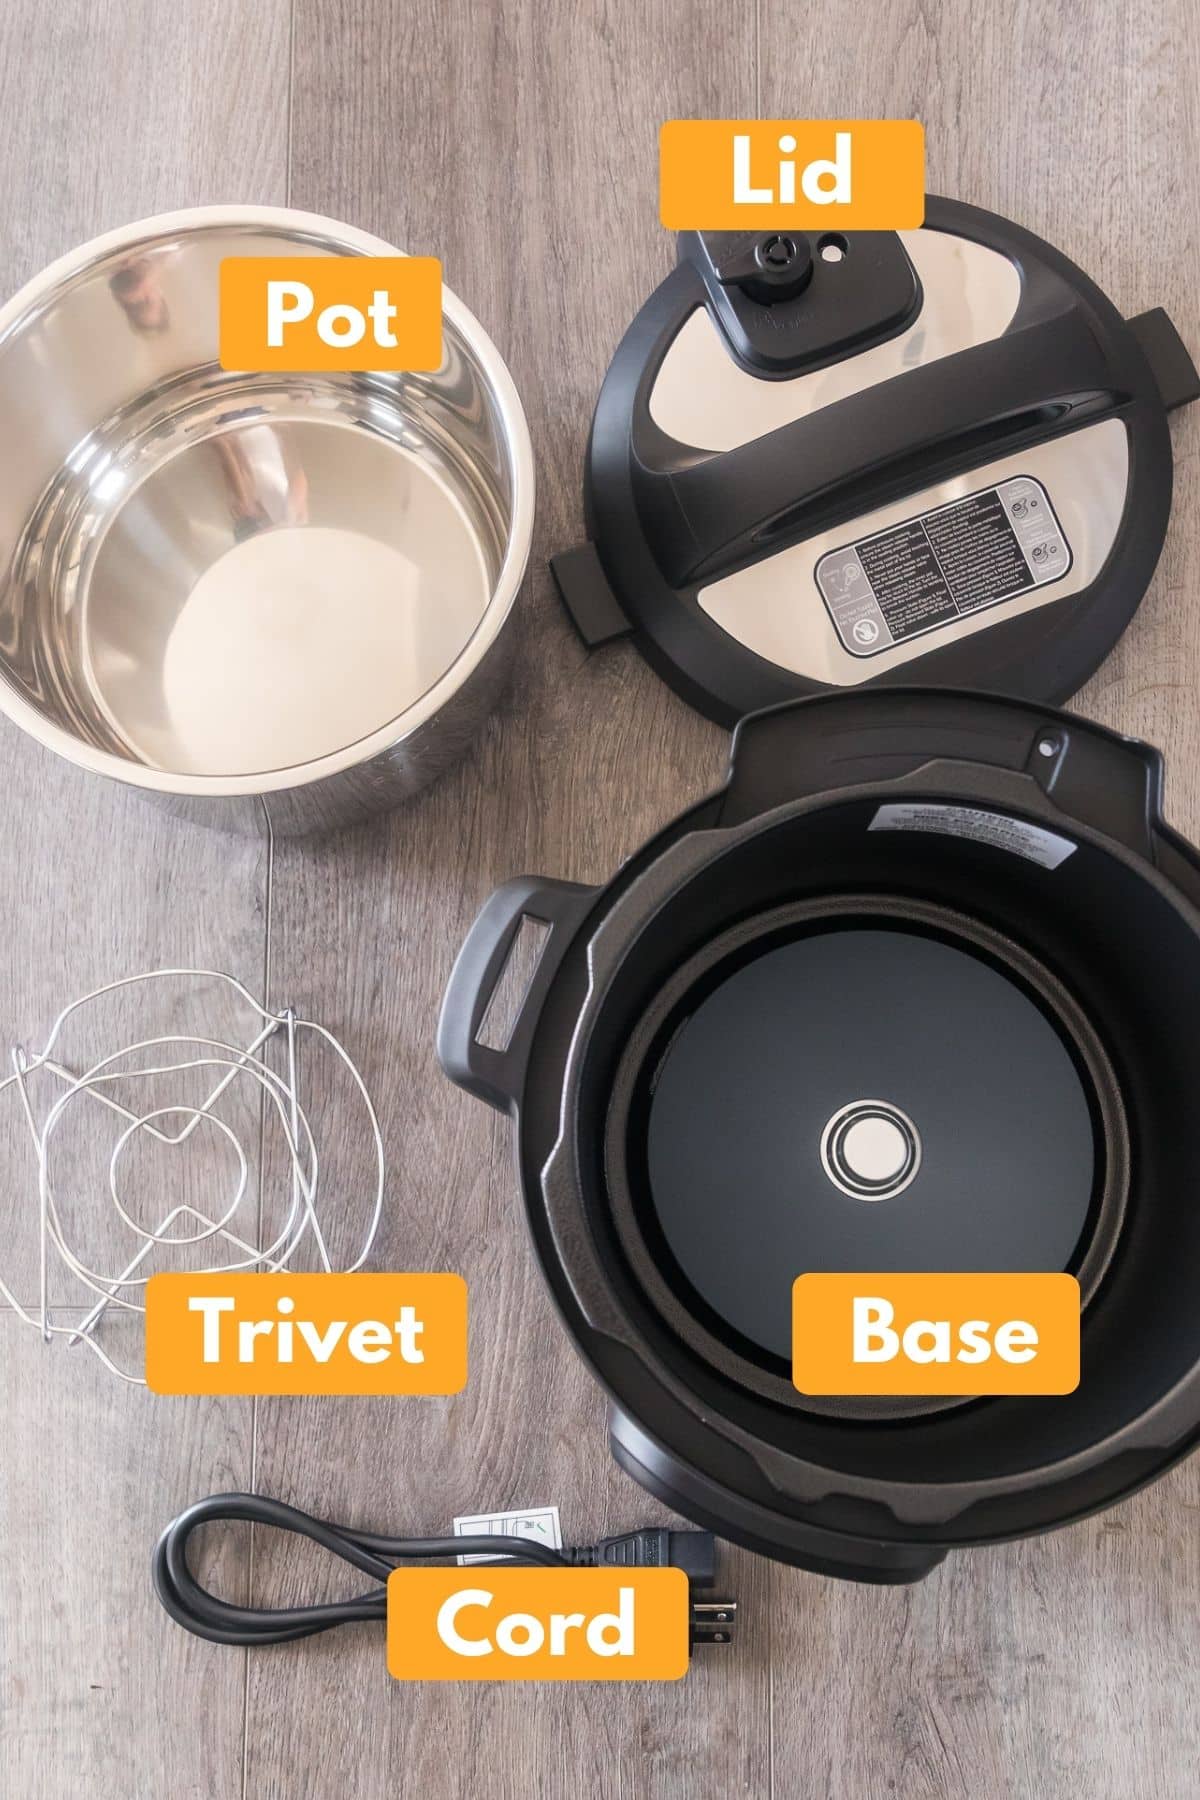
The Instant Pot Duo comes with five basic pieces, including:
- The main base where the buttons are located,
- the inner stainless steel cooking pot,
- the lid that has a seal on the underside,
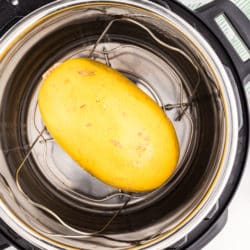
- the stainless steel trivet (you won’t be using the trivet for every recipe),
- and the electric power cord that plugs in the back of the base.
3. Familiarize yourself with the panel
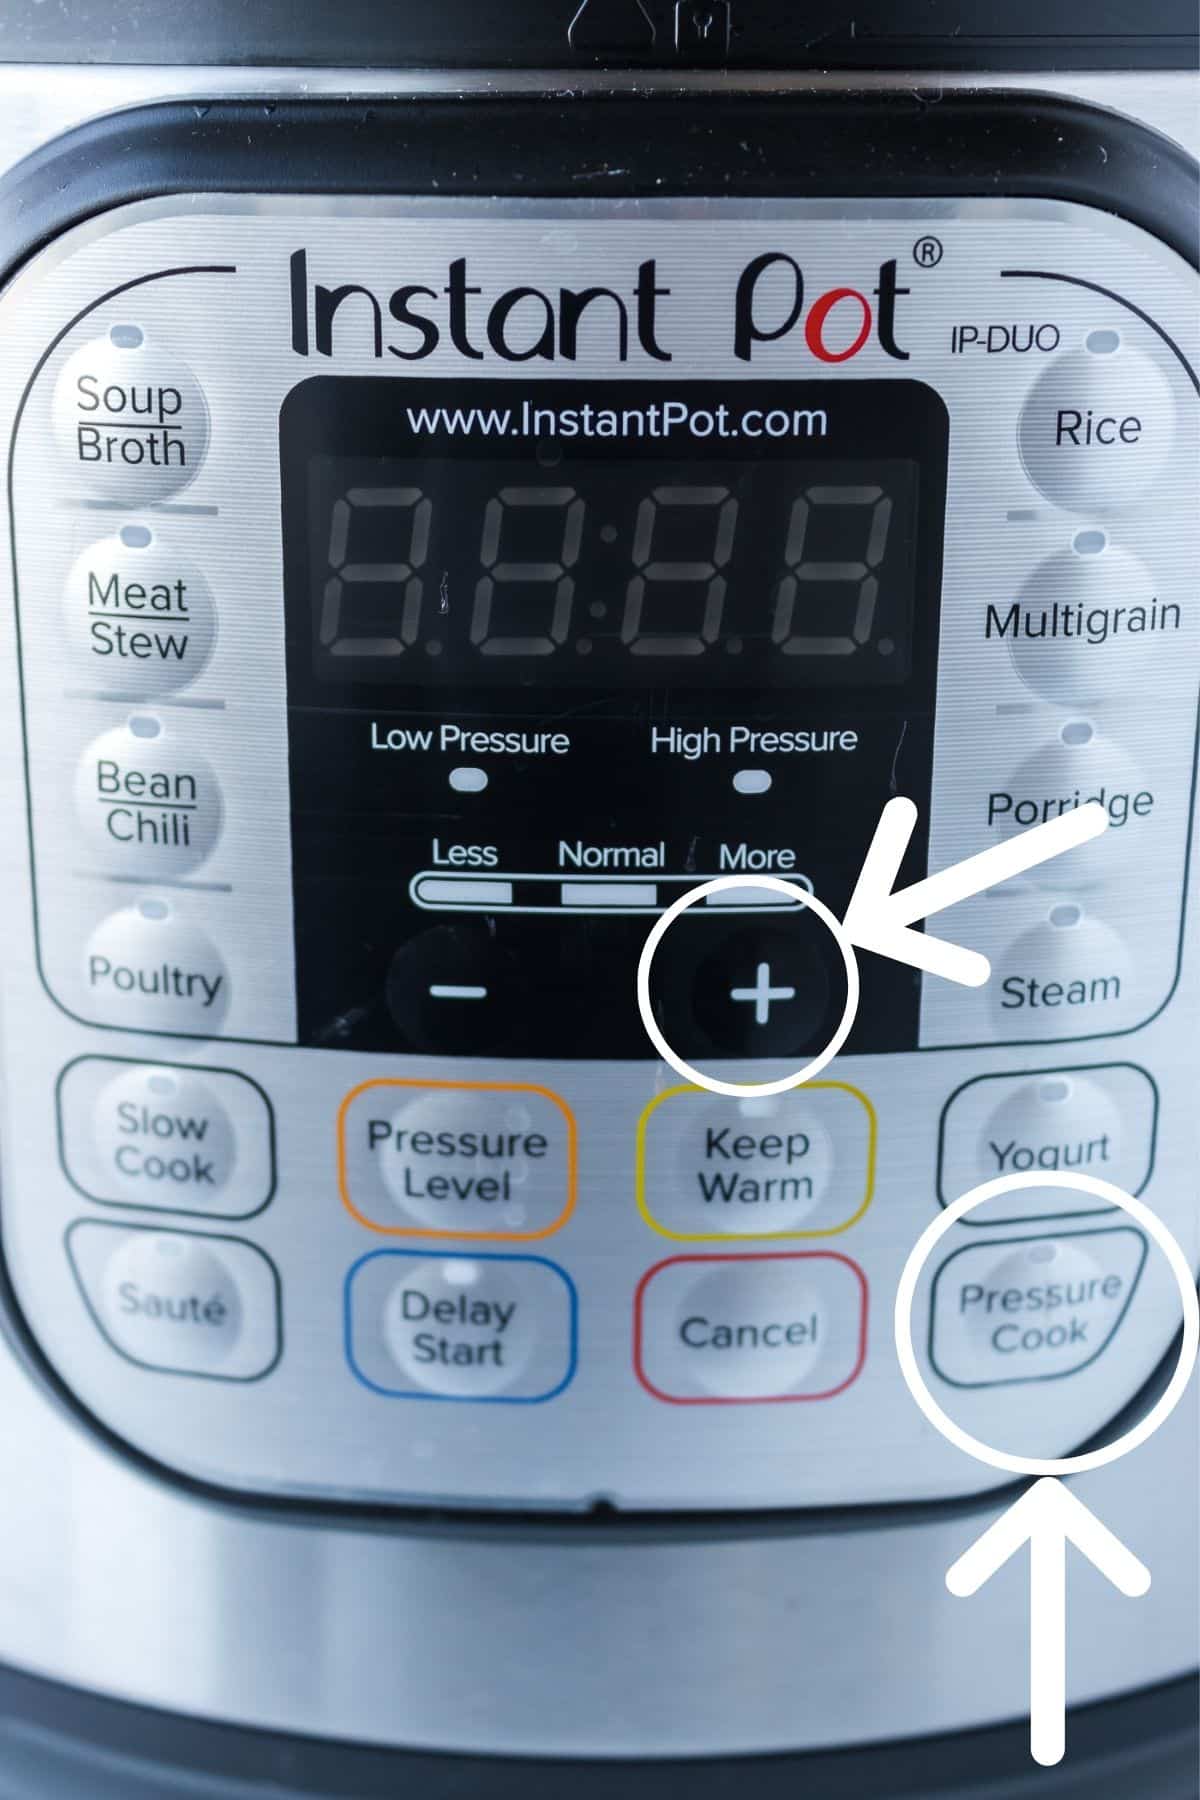
The control panel with all the buttons can be intimidating, but you actually only need to use a few settings.
- Pressure Level button – make sure it is set to high
- Pressure Cook button – use the up and down arrows to set the cook time (you’ll need to know exactly how long to cook whatever it is you’re cooking)
- Cancel button – if you need to cancel the program or stop the cooking process
4. Understand how to start the Instant Pot
Just forget about all those other buttons on the panel for now. And, just in case you were wondering, there is no Start button on the Duo.
Once you’ve pushed the Pressure Cook button and set the time using the up and down arrows, then the Instant Pot will start by itself.
The LED screen will show you the time you’ve set, and the time will count down once the post has come up to pressure.
You can also use the other buttons that have smart programs (like for soup, meat, beans, or rice), but you don’t need those buttons for the first time you use your Instant Pot Duo or Instant Pot Duo Plus.
5. Wash the pot, trivet, and lid
It’s important to wash the pot, trivet, and lid of the Instant Pot Duo before you start to use it.
You can easily just wash them in the sink with a mild dish soap and a sponge, or you can run the pot and the trivet through the dishwasher.
The lid of the Instant Pot should not be put in the dishwasher. It’s best to always wash the lid by hand in the sink. This will help preserve the seal that is installed on the underside of the lid.
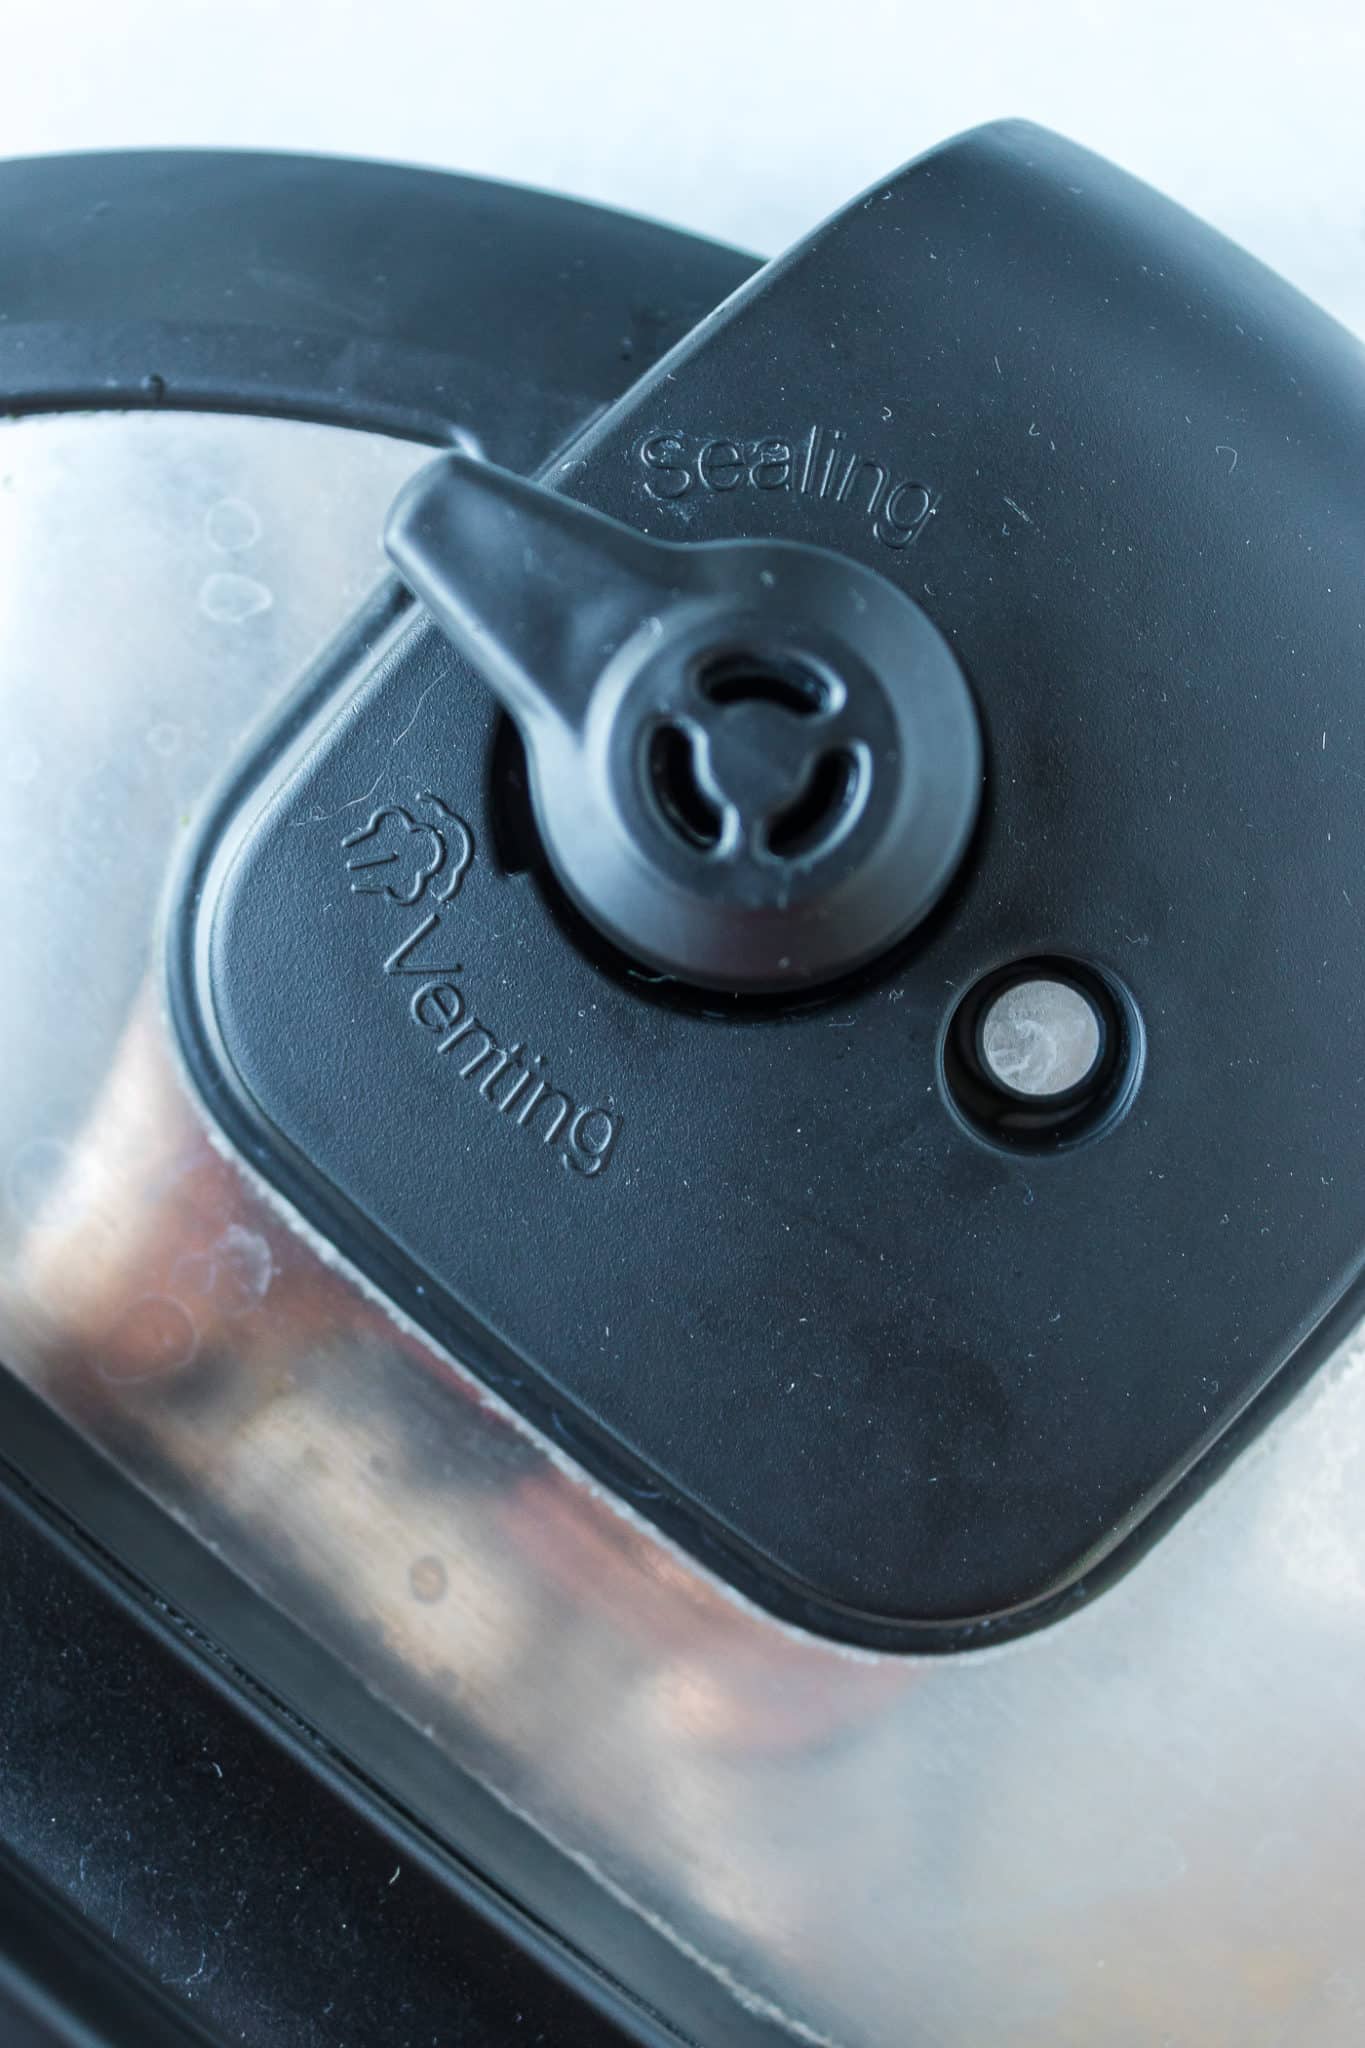
While we are talking about the lid, it’s important that you take note of the sealing valve (also called the float valve). There are two settings of the Instant Pot Duo lid: sealing and venting.
When cooking something, the seal should always be set to sealing. When you need to release the pressure, the seal should be set to venting (see my cautions below about venting).
Learning the difference between the venting position of the steam release valve is one of the most important things to know.
6. Do the water test
Now that you are familiar with the basics of the Instant Pot, it’s time to talk about how to use it to cook.
I suggest that you start with something very easy, like doing a water test that the Instant Pot company suggests you do. This initial test run ensures that your device is working correctly and is important to do for new Instant Pot users (and also if you’ve purchased a used device or one of the older models).
To do the water test, add 3 cups of water to the stainless steel inner pot. Lock on the lid and set the time to 3 minutes at high pressure. Make sure the sealing valve is set to “sealing.”
Let the Instant Pot do its thing. As long as you don’t get any error buttons, you have set it up correctly!
Once it is done cooking, you can let the pot sit for about 10 minutes to let the pressure come down a little bit naturally. Then, you can carefully move the sealing valve to “release” to let out the pressure and pour out the water in the pot.
You have now completed the Instant Pot water test.
Always use an oven mitt or a towel to protect your hands when you are adjusting the sealing valve from sealed to venting.
Your First Instant Pot Recipe
Once you have followed all of these initial steps and you have a basic idea of how your Instant Pot Duo works, then it’s time to actually cook something!
Until you feel really comfortable using a pressure cooker, then I would advise you to use recipes specifically for the Instant Pot. Pressure cooking is not like slow-cooking which is very forgiving.
Unless you want to have a bunch of Instant Pot fails, then it’s really best to use recipes. Here is a great post with beginner recipes for the Instant Pot that includes some of my favorite recipes.
See my entire index of healthy Instant Pot recipes.
Also, don’t miss my recipe round-ups of Instant Pot healthy chicken recipes and Instant Pot soup, stew, and chili recipes.
Or, you can also join my newsletter and I’ll send you my Instant Pot Cheat Sheet that includes a quick start guide to healthy cooking with your pressure cooker.
Instant Pot Duo FAQs
The easiest way is to plug it in and use the manual button to set the time for whatever food you’re cooking. There is no start button on the Duo. Once you set the time for the desired number of minutes, the Instant Pot will start by itself.
There are safety features that prevent an Instant Pot from exploding. It is very, very unlikely that you Instant Pot will explode, especially if you follow the directions.
The Instant Pot is a pressure cooker which means the heating element heats up and creates steam inside. The steam is trapped and creates pressure which cooks the food quickly.
The burn message usually means you didn’t add enough liquid or there is food stuck to the bottom of the stainless steel insert. So, you have two choices. Add more liquid or use a wooden spoon to remove whatever is stuck on the bottom and then try again.
This is a common problem. The cause is that the rubber seal on the inside of the lid is very good at absorbing odors. So, before you know it, your Instant Pot lid can start to stink from garlic or whatever else you’ve been cooking.
My best tip to keep the lid from stinking is to wash it after every use and then store the lid upside down on top of the Instant Pot base. By storing the lid upside down, you’ll expose that underside and the seal to the air which will keep it from stinking.
Final Tips for Instant Pot Duo
I promise that learning how to use the Instant Pot is worth the effort. Once you are comfortable using it, then you’ll save so much time cooking healthy favorites. I’ll leave you with two final tips for getting started.
- Remember that most recipes will take between 10-15 minutes to come up to pressure before the cooking time starts. So, you need to factor in that extra time to your schedule.
- You can use the natural release or the quick release to let out the pressure from the Instant Pot. Most recipes will indicate which method to use. Get healthy recipes for your Instant Pot by checking out my Instant Pot recipe index.
- Lastly, have fun with your new Instant Pot Duo! There is an endless supply of delicious and healthy recipes that you can make with your Instant Pot, from Instant Pot Brownie Bites to an Instant Pot Whole Chicken.
- There are also numerous Instant Pot-authorized accessories and Instant Pot cookbooks that can make your pressure cooker even more efficient. Push yourself to try new flavors and recipes and you will surely fall in love with this way of cooking.
Don’t Miss These Instant Pot Resources!


Don’t forget to join my newsletter list to get exclusive clean eating recipes and tips. The newsletter is 100% free with no spam; unsubscribe anytime.
About the Author: Carrie Forrest is the author of the best-selling Instant Pot-authorized cookbook, The Healthy Meal Prep Instant Pot Cookbook. She has a master’s degree in public health with a specialty in nutrition and receives nearly 10 million annual visitors to her site. Send Carrie a message through her contact form.


I was hoping to find how to set the timer for 8 hours for the slow cooker option. I’ve been searching everywhere and nobody mentions it. So confused! All the Youtube videos have a different Instant Pot with a button that says TIMER, but I do not. I have the DUO. This site was not helpful to me and it’s very frustrating! Not even the instructions say HOW to set to 8 hours!!!
Cheryl, you hit the slow cooker button and set the function to normal. Then, use the arrows to set the timer to 8 hours (480 minutes).
Hi there. I have a 8quart instant pot & it says use a minimum of 1 1/2 cups of liquid or it will burn. My question is how do you adjust your recipe if it’s say a sweet & sour sauce without watering down your sauce if you need to up the liquids to 1 1/2 cups
If liquid? Thanks
Hi Cindy, the best bet is to double the recipe if it has been written for a 6-quart Instant Pot (most recipes are written for 6-quarts). You can safely double most recipes as long as the contents don’t go past the max line on the inner pot!
Carrie, Thank your for the video. It was very helpful. Do you have to wait until the pressure valve is completely down before you move the valve from sealing to releasing? Thank you.
Hi Sharon! I’m so glad the video was helpful. So, there are two ways to release the pressure. You can wait until the valve is completely down and then just remove the lid. This is called the “natural release” method. The other method is called “quick release” and that is when you move the valve before it has gone down. You just need to be really careful if you do the quick release method because a ton of steam will start coming out. It is a valid method, but you just need to be really careful (use an oven mitt to move the valve from sealing to releasing, make sure there is nothing in the way of the steam, and don’t get close to it). Does that help?
isn’t there a step initially re: water something?
Yes, I just updated the post to include directions for the water test. Here’s what I suggest: To do the water test, add 3 cups of water to the stainless steel inner pot. Lock on the lid and set the time to 3 minutes at high pressure. Make sure the sealing valve is set to “sealing.” Let the Instant Pot do its thing. As long as you don’t get any error buttons, you have set it up correctly!
Once it is done cooking, you can let the pot sit for about 10 minutes to let the pressure come down a little bit naturally. Then, you can carefully move the sealing valve to “release” to let out the pressure and pour out the water in the pot. Always use an oven mitt or something to protect your hands when you are adjusting the sealing valve from sealed to release.
This is super helpful; thank you Carrie! We are big fans of eating whole foods with minimal processing and sugars, which has led me to Whole30 and paleo recipes. It’s refreshing to find recipes like yours that are healthy and nutritious. Thank you for taking the time to lead the way for the rest of us!
Awwww, thanks Carrie! I’m so glad you found my site and that it has been helpful.
I just bought my first Instant Pot two days ago and have been trying to overcome my fears so I’m happy to see your post!! I have Celiac so finding you was wonderful! I look forward to many yummy dinners in the new Pot.
PS I’ve used a regular pressure cooker and it was scary. This has to be better, right?
I’m so glad, Allie! YES, the Instant Pot is sooooo much easier and less scary than the old stovetop models. You are going to LOVE it!!!
I’m not sold on this cooker yet. The use of the word “amazing” is not enough to convince me to get one.
I can’t figure out how to use the delay start button. I have a 3 quart IP and wanted to slow cook a stew for 2 hrs ~ but wanted to delay the start for 4 hrs so it would be done when I got home from work. Nothing seems to happen when I press the delay start button ~ what am I doing wrong?
Hi Gloria, this comes from the manual – o start delayed cooking, first select the desired cooking function (all program functions except “Sauté” and “Yogurt”), and then press the “Timer” key. Use “+” and “-“ to set the delayed hours. Press the “Timer” key again to change the minutes.
Hi!
I’m a pescatarian, before I jump into this I would like to know if there are enough options to fit my dietary needs? Thank you.
Oh you bet there are!!! You will find a ton of Instant Pot recipes to meet your needs.
Thanks. I had a “fail” and am so happy for your post
Oh no! What do you think went wrong, Kirsten?
Every time I try to not use a preprogrammed button, my instant pot doesn’t start. Not sure what I am doing wrong.
Which model do you have? On a Duo, there is no start button. You just push the program button and it will start on its own.